Over the past week I have kicked into high gear for my building. Someone once told me "The key to finishing your homebuilt is working on it everyday, whether it's a blog post, a plans review or getting in there and pulling some rivets."
On Memorial Day, my dad was off work, which provided an excellent excuse to work for 12 hours!
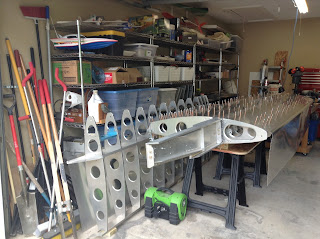
After an assessment of the plans it was made clear that the first step to skinning the wings was to make sure the inside was clean and all the internal plumbing was complete.


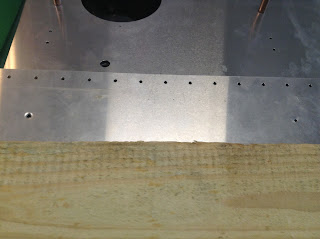


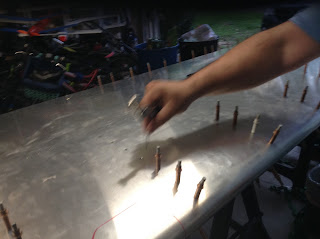
 Uh oh what's that?!? Just as we were finishing clecoing the skin, an undimpled hole appeared! Well it didn't magically undimple itself, it must have been missed by the original builder. with over 80 holes that ALL need dimpling, it is not surprising that one was missed.
 Off the straps came: time to dimple that hole.
 On the straps went: Mission accomplished.

 Finally It was done, and just in time I was hungry and had my first cleco plier blisters to deal with.

 After an excellent lunch my sister Nicholette prepared for me, It was rivet time. I double and triple checked the plans, then asked dad if he knew of anything I was missing. "Nope" he said. I took a crash course on riveting with the hydraulic rivet gun. Square to the surface not the ground, Move around frequently but efficiently, Don't walk to the garbage can every time you pull a rivet instead gather them in your hand and dump them when you pass by.


On Memorial Day, my dad was off work, which provided an excellent excuse to work for 12 hours!
After an assessment of the plans it was made clear that the first step to skinning the wings was to make sure the inside was clean and all the internal plumbing was complete.


First I used the air compressor to blow all the dust and aluminum shavings out of the wing skeleton, then wetted a paper towel with lacquer thinner. The lacquer thinner removed all the sharpie and harmful oils. After the metal was cleaned, it was time to fit the skins. The previous owner had already drilled the left wing skins both leading edge and top/bottom aft skins. We clecoed the aft skins starting at the rear spar. and working down and out like a wave.


Cleaning the top aft skin

Clecoing the top aft skin


Yes! It's done right?

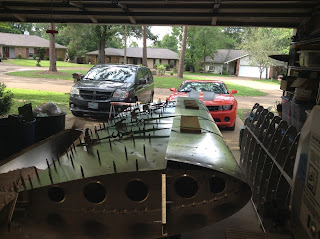
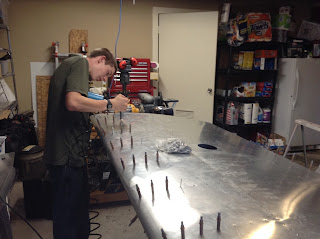
Not quite, still need to cleco the leading edge skin. I clecoed on the skin using the intersection of the aft skin, sparcap, and leading edge skin as a starting point. For One hundred and Forty holes, Dad and I clecoed the leading edge skin. When it was all done, we flipped the wing over for the tricky part.

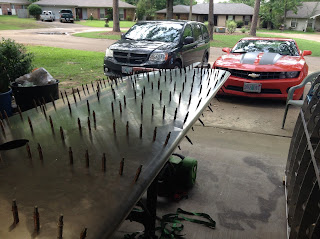
Or not, It seems that over the course of building two Sonex kits, my dad had perfected his technique for bending the leading edge skin. He told me to gather 4 ratchet straps, and some wooden planks. we used the ratchet straps to inchworm the skin down evenly. This didn't make it lie flat on the ribs though, so we still needed to walk the skin down by clecoing every hole.


I riveted Dad took pictures, pulled clecos, and replaced them with the appropriate size of rivet. this went on until the sun went down, but as I riveted I watched my wing slowly turn from a spikey wing like thing, to a familiar airplane part. However a quick flip revealed the spikey underside.


Me riding in the cockpit looking our over the wing.

Thank you so much to everyone who helped me.
Mr John
Paul Shadwick
Stan Whitfield
Ron Sipple
Ralph and Joyce Shultz
Paul and Beth Duff
Paul Hockin
Nicholette Shultz
Gordon Fern
Anon Anon
Jeannette Shultz
Mike David
Jonathan and Julia Wolfe
Jon Palmstrom
Laurie Burns
Donna Mickel
Dana Baker
Mrs Nadine
Eric Johnson
Tammy Reap Hayes
Jeff Shultz
Brandon Lenart
WP Maesh
Michael Couillard
Mr Anonymous
Joe And Judy Green
Mrs Brenda
Mrs Cathy
Paul and Vickie Laberge
Judy and Roger Kemmerle
As this is June 6th I am including a D-Day tribute.
When I lived on Fort Carson, the biggest Infantry Division stationed there was the 4th ID. The 4th ID was one of the forces involved in the Normandy invasion.
  |
The purpose of this blog is to document and share my experience of building and later flying an airplane. In the first portion, I will thank all the wonderful people who donated to me. Then in the second section I will post a building update, hopefully every 3-4 days ,explaining what I have done in detail and with pictures. Finally in the third and last section, I will post my flying adventures, and any maintenance I do. Thank you or your support and interest, I am pumped to be executing this project.